Full Stack Web Development Internship Program
- 5k Enrolled Learners
- Weekend/Weekday
- Live Class
Scratching your head while thinking what is Netbeans? Well, this is the right place for you. Netbeans is an open-source integrated development environment for developing with Java, PHP, C++, and other programming languages. This NetBeans tutorial will provide you with the basic workflow along with the complete insight on the installation of Netbeans. let’s have a look at the agenda for this article!

Netbeans is an open-source Integrated Development Environment (IDE). It is used to develop applications with Java, PHP, C++, HTML and many other programming languages. The applications are developed using modules in Java. NetBeans can run on any operating system such as Windows, MacOS, Linux etc.
Moving ahead, let’s see how to set up NetBeans.
Let me guide you through the process of installing NetBeans on your system. Just follow the below steps:
Step1: Go to the link: https://netbeans.apache.org/download/index.html. You can find the various versions of NetBeans with respect to the coming years. Latest version is Apache Netbeans 11.1. You can go ahead and download any version as per your choice.
Refer to the below screenshot to get a better understanding.

Click on the download link against your matching system configurations. Once you are done with the download, you have to select the Accept License Agreement radio button and you will be guided through the steps to install IDE.
By following these steps, you are done with the installation part. Moving ahead in this NetBeans tutorial, its time we build our own Java application.
Excited? Let’s get started!
Netbeans IDE has an easy layout structure with limited numbers of buttons.
Let’s see how NetBeans UI looks like:

Noe, let’s create our first Project.
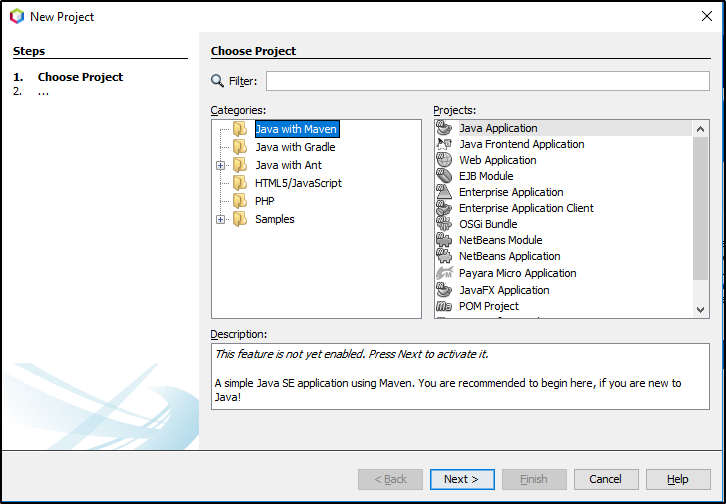
Just go to File -> New Project. Select the “Java” category and “Java Application” projects. Refer the below screenshot for more understanding:

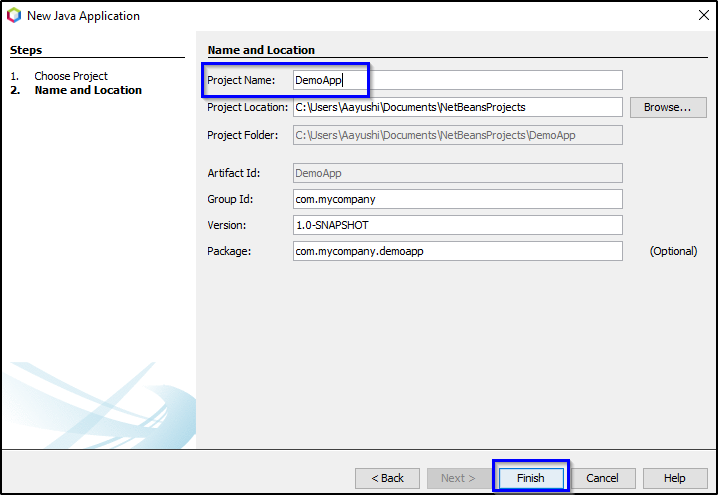
Select Next and Name your first project. You can also change the project location as per your convenience.

Click on “Finish” and you are set to go, your project is ready!
After the project has been created the next step is to create a Java source file.
Right-click the package name and choose New and then Java class.
Now in the New Java Class wizard, type Main in the class name field and then click finish!

Your Java source file will be created and opened.
There are certain components that you must look at:
Source Editor: It is the central area which contains files where you will do the work currently with the Java source file called main open.
Projects window: It is in the top left and contains source files and libraries on which our core depends and several other components.
Navigator: It is in the lower left which is useful for navigating between elements within the class that you have selected.
Now, the next step is to adding code to the Java source file.
The Main class that you created will help you to create some content to produce hello world message.
The code to achieve the task looks like this:
package Demoapp;

public class DemoApp {

    public static void main(String[] args) {
            System.out.println("Hello World!");
    }

}
Hello world would be printed on the output screen!
After looking at the code let me show you how to run the application.
You must save the Java source file first, after that right-click the project and choose Run or choose Run project under the Run menu. After that select Main class.
You will see that your application is working. The build output can be seen by opening the Files window and after that expanding the Target node.
To know more about Java and its program, here are a list of few articles that might help you:
With this, we have reached towards the end of the blog. I hope you guys are clear about each and every aspect that I have discussed above. Keep reading, keep exploring!
Now that you have understood basics of Java, check out the Java training by Edureka, a trusted online learning company with a network of more than 250,000 satisfied learners spread across the globe. Edureka’s Java J2EE and SOA training and certification course is designed for students and professionals who want to be a Java Developer. The course is designed to give you a head start into Java programming and train you for both core and advanced Java concepts along with various Java frameworks like Hibernate & Spring.
Got a question for us? Please mention it in the comments section of this “NetBeans Tutorial” blog and we will get back to you as soon as possible.
| Course Name | Date | |
|---|---|---|
| Java Certification Training Course | Class Starts on 28th January,2023 28th January SAT&SUN (Weekend Batch) | View Details |
| Java Certification Training Course | Class Starts on 25th February,2023 25th February SAT&SUN (Weekend Batch) | View Details |
 REGISTER FOR FREE WEBINAR
  Thank you for registering Join Edureka Meetup community for 100+ Free Webinars each month JOIN MEETUP GROUP
edureka.co
